
 日本語
日本語
FAQ:
What if the problems shown the two following pictures happen?
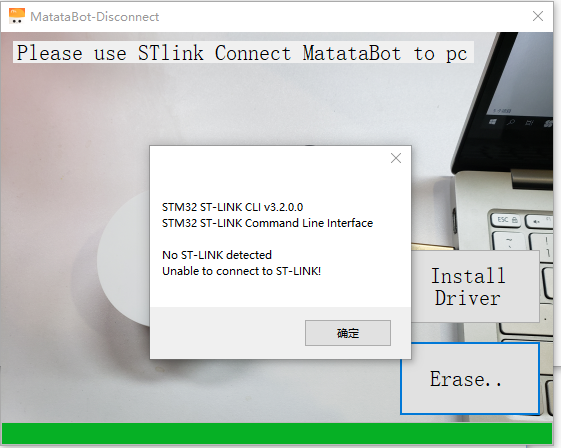
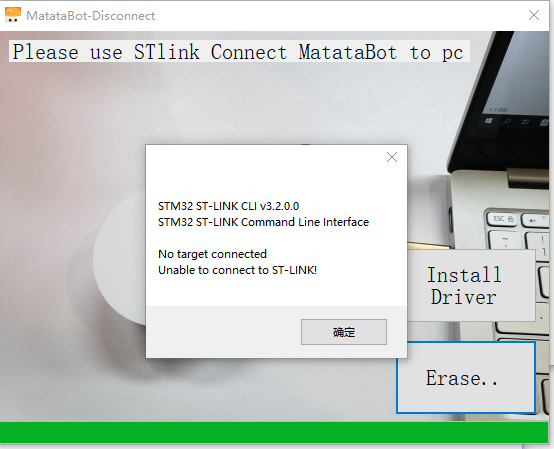
1. Please check if the MatataBot is turned on (Refer to Step2)
2. Please check if the ST-link is connected upside dwon (Refer to Step3)
3. Please check if the driver is installed (Refer to Step7)
If there are still problems after you check the above three steps, please turn to our customer service for help.
Step1. Materials

Please get ready of the following materials before upgrade
- ST-Link cable (Click to buy)
- A MatataBot
- A Win10-PC
- A iPhone (ios11 or upper system)
Step2. Turn on the MatataBot
Attention: It's neccessary to turn on the MatataBot first, otherwise, it can NOT be upgraded successfully!

Step3. Connect the MatataBot using the ST-Link cable
Attention: Please connect the ST-lnk in the way the picture shown, otherwise, the upgrade software will fail to detect your MatataBot.

Step4. Connect the MatataBot to the PC through the ST-Link cable

Connect the other side of the ST-Link cable to the PC
Step5. Download and set up MatataBotUpgrade.exe
Please click the following icon to download

Step6. Decompress and start the program (Please right click and choose "Run as administrator")

Step7. Run the software
Please click "Install Driver" to install. (P.S. If there is no respond, it's because you already have this driver in your computer, please proceed to next step.)

Click "Update" to start

Step8: Download MatataCode App on you Phone.

Please scan the UR code to download or go to AppStore and search "MatataCode" to download.
Step9: Turn on MatataCode

Step10. Follow the steps on GIF
On the App: Click "Upgrade" --- Click "Search" --- Click "MatataBot" (or matatalab) which is the device detedcted --- Click "Ready" --- Click "Search" again --- Click "mdfubot" (or MataDfu) which is the device detedcted, then start to DFU ungrade

You will hear a cheer sound and some blinks of the LED eyes of MatataBot after the upgrade is finished.

How to re-pair?
How to re-pair the Command Tower and MatataBot?
Turn on the device and rapidly click the power button of the Command Tower 3 times. It will enter the re-pair mode with fast flashing blue light. When you hear the sound "deng deng", the Command Tower has been re-paired to the MatataBot with both stable blue indicated light.

How to re-pair the Controller and MatataBot?
Switch the Controller to the control mode or coding mode. Turn on the device and rapidly click the power button of the Controller 3 times. It will enter the re-pair mode with fast flashing blue light. When you hear the sound "deng deng", the Controller has been re-paired to the MatataBot with both stable blue indicated light.

How to re-pair the Controller and Command Tower?
Turn on the devices. First re-pair the Controller to the MatataBot as the above method.
Switch the Controller to the sensor mode, the indicate light of it will turn red and keep flashing.
Rapidly click the power button of the Command Tower 3 times, it will enter the re-pair mode with fast flashing blue light. When you hear the sound "deng deng", the Command Tower has been re-paired to the Controller with both stable blue indicated light.
Note: Before successfully paired, the indicated light of Controller under the sensor mode is flashing with red light, and the Command Tower is flashing in blue.


